ESI Spectrograph Electronics Manual
![]()
![]()
![]()
Signals:
The signals section of the manual contains descriptions of the signal assignments for the Eshelette Spectrograph and Imager, ESI. It corresponds to the signals tab in the electronics schematics binder.
Signal Assignments, EL-3320, EL-3321, and EL-3322
These three sheets, and drawings EL-3324, EL-3325, and EL-3326, show the signal assignments for the Galil controllers and amplifiers. We will look at the first and fourth sheets to illustrate how to use the two different types of sheets. The first three sheets describe the signal assignments at the Galil DMC-1580 connectors. The next three describe the signal assignments at the terminal board of the Galil AMP-1140 panel. Each of the Galil controllers is capable of running eight axes but in our case the first controller, controller #0, is running eight axes but the second is only running four axes. For this reason, controller #0 requires two sheets of assignments and controller #1 only one.
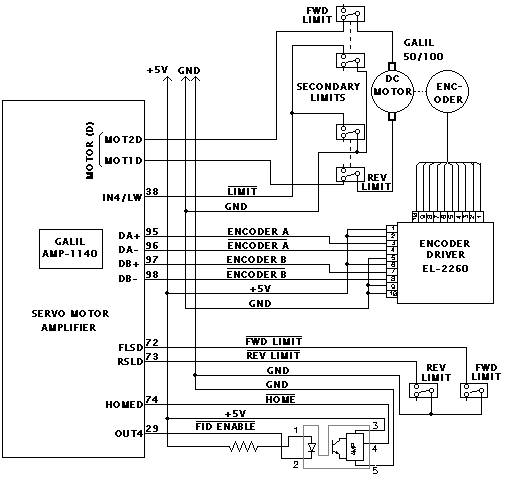
First, sheet EL-3320 contains three boxes. On the left side of the sheet, the box gives the signals for J2 labeled 'Main'. This denotes the ribbon cable connector on the top of the controller. This cable connects into a mating connector on the AMP-1140 module. The signals that we use are the controller's limit switch inputs for the Slit Mask Wheel, the Filter Wheel, Aperture Wheel, and the TV Focus stage on pins 6-17. In the cases of the three wheel stages, the forward and reverse limits are not wired because they are unconstrained rotary stages, that are able to rotate continuously. Pins 25 through 32 are the analog control voltage and enable signals for each of the stages. The controller generates a +/- 10V control signal that is supplied to the servo amplifier. Note, the controller is also capable of generating stepper motor output but we only use servo motors in this equipment. The last set of signals that we connect to are the encoder inputs. You can see on the drawing that the wheel stages are connected to Renishaw linear encoders and that the TV Focus stage is connected to the stage's motor encoder. This points out the flexibility of the Galil system. In the case of the wheel stages we are using dual-loop encoding. By connecting the Renishaw encoder to the motor encoder input we are able to servo to within +/- 5 microns of the specified position. The TV Focus stage does not need this sensitivity and thus the motor encoder is the only encoder used.
The second box on the sheet shows the J5 general I/O signal connections. We are using the first three analog inputs, pins 1-3, in conjunction with digital outputs 5, 6, and 7 to read the analog signals from the EL-1230 24-channel analog input board. This board provides inputs for monitoring the various power supply voltages and temperature sensors. Next, digital outputs 1 through 4 are used to turn on the fiducials for each of the stages (refer to the drawing below to see how the fiducials are wired.) These are TRW OPB970T55 slotted optical switches. The last set of signals we use in this block are digital input bits 1 through 4. These are wired to the secondary limit switches again, as seen on the schematic below. Note that to conserve I/O bits, we have tied the normally open terminals of both the forward and reverse secondary limits together. The second pole of these limits are used to interrupt the power to the stage servo motor. This means that if a stage moves beyond it's software limit and then moves beyond it's primary hardware limit and into it's secondary limit, the only way to move it back out is to manually move the stage by turning it's motor shaft!
Example Stage connections
The last box shows the J3 auxiliary encoder connections. On the stages that we run in dual-loop mode, either the motor encoder or the secondary encoder is wired to these inputs depending on the needed resolution and repeatability for the stage. (See discussion on dual-loop encoding for more details.)
The note under the first box points out that though the stages are marked as X, Y, Z, and W, but we are referring to them as A, B, C, and D. Either designation is allowed by the Galil controller but because we are using eight axes, we have opted to use A through H.
The second sheet, EL-3321, and the third sheet, EL-3322 show the wiring for the rest of the stages. EL-3321 show the connections for the three dual-loop encoded collimator stages and the single-loop encoded TV filter stage. EL-3322 show the connections for the Post Dispersion Prism stage, the Image Flat Mirror stage, and the Low Dispersion Flat Mirror stage.
Signal Assignments, EL-3324, EL-3325, and El-3326
These sheets present the Galil connections as they come from the AMP-1140 break out connectors. In most cases, the 'TO' column tells which pin on which connector the signal is wired to. That is to say, a wire connects the screw terminal of the AMP-1140 to one of the CPC connectors on the amp's connector panel. The exception to this rule is that the wires going to the Analog Input Interface Card, marked AIIC, are wired directly to the mating 14-pin IDC connector. Note that the motor control signals on pins 2 through 17 are left unwired. This is because the connections are made directly via the PC board.
The interconnections to the EL-1230 24 Channel Analog Input board consist of wires on pins 18, 19, 20, 25, 30, 31, and 32. The three analog inputs on pins 18, 19, and 20 connect to three 8-input analog multiplexers on the EL-1230 board via a 14-pin IDC connector. Pins 30, 31, and 32 bring the digital I/O bits OUT5, OUT6, and OUT7 out via the same connector to select one of eight inputs to each of the three muxes. Pin 25 provides the ground for the signals.
Also in column one, the OUT1 through OUT4 are each wired to pin-21 of the 27-pin stage connectors J1, J2, J3, and J4. These signals are pulled low to enable the fiducial on the associated stage. In column two the secondary limits are shown being wires to pin-5 of the stage connectors. Below that are the connections for the stages secondary encoder where used. As noted on the drawing, the Aperture Wheel, Filter Wheel, and Slitmask Wheel all have their motor encoder wired as the secondary encoder and their Renishaw encoders wired as the main encoders. Below the encoder signals and on the top of the third column are the stage limits switch signals. Each stage has a home, forward limit, and a reverse limit signal that is wired to pins 15, 16 and 19 of the stage connectors. The limit inputs signal the controller to ramp down to a stop and the home signal is used to 'zero' the encoders. The last group of signals in the third column is the primary encoder inputs. In the case of the TV Focus stage these are wired to the servo motor. On the other stages they are wired to the Renishaw high resolution encoders. Again, see the discussion on dual-loop encoding for details.
The next two sheets, EL-3325 and El-3326, show the wiring for the rest of the stages.
The two sheets of this drawing show the wiring for the +5V and Ground terminal strips. The first column shows connections to the +5V bus. The second and third columns show connections to the Ground bus and the last column shows the 110VAC wiring on the Galil panels. Additionally, sheet two shows AC connections for the stages brakes on the Post Dispersion Prism, Image Flat, and Low Dispersion Flat stages. As noted at the bottom of the various terminal boards, there is a bus bar connecting the terminals together on each terminal strip.
sheet 1:
(Refer also to drawing EL-1266) Referring to the first column or TB-A, pin-1 is wired to pins 57 and 56 of connector J10. This is the large 57-pin CPC connector on the amp connector panel. It brings in the logic 5 volts and ground from the terminal strip to be distributed to the stage connectors. In the 'THEN TO' column these signals are shown being wired to pins 11 and 20 of the stage connector J1. In other words, the +5 volt line is wired from pin-1 of the terminal strip to pins 56 and 57 of the large connector on the amplifier panel and from that connector to pins 11 and 20 of connector J1 which in this case is the stage connector for the slit mask wheel. This same scheme is used for terminal strip pins 1 through 8 for each of the various stages. Terminals 9, 10, 14 and 15 are wired through J10 to pin 9 of connectors J21 through J28 to supply 5 volt to the stage encoders. The rest of the terminals do not connect to the amp connector panel. Terminals 11 and 12 are wired to the Opto-22 relay module panel's '+' connection. Lastly, terminal 13 supplies power to the manual paddle via J9 pin-14.
Terminal board B, TB-B, supplies ground connections to the various stages via the large connectors either J10 or J20 depending on the amplifier. The first two terminals provide grounds directly to the AMP-1140 ground tie point. These wires connect from the large CPC connector directly to the black screw terminals on the amplifier. The rest of the grounds are wired in a similar fashion as +5 volt lines.
Terminal board E, TB-E, supplies ground connections to the Opto-22 relay panels from terminals 1 and 2. Terminal 8 supplies the ground connection to the manual paddle for Galil plate #0. Terminal 9 supplies a ground for the coolant flow switch and terminals 10 through 13 supply grounds for the stage encoders.
Terminal board G, TB-G, distributes the 120VAC on Galil panel #0. The hot lead is connected to Opto-22 panel 1. The triple supply logic power supply, and the motor power supply are wired to pin-2. The neutral leg is connected to the TV Power connector, the logic supply, the motor supply and the fan connectors.
sheet 2:
Terminal strips TB-C, TB-D and TB-F are wired the same as the previous descriptions but the stage names are different.
Terminal board H, TB-H, distributes the 120VAC on Galil panel #1. As above, the hot lead is connected to Opto-22 panel 4, the triple supply logic power supply, and the motor power supply. The neutral leg is connected to the logic supply, the motor supply, the fan connectors and the hatch stage.
The Stage Brakes terminal strip connects to the +28 Volt motor power supply. The terminal strip then distributes the voltage to the various brake stages.
Signal Assignments, EL-3333 and EL-3334
These drawings are provided for a quick reference of the various connector numbers and functions. EL-3333 shows the connectors associated with Galil panel #0 and EL-3334 does the same for Galil panel #1.
Each of the next six schematics show the layout for one of the Opto-22 relay racks used in the instrument electronics. The sheets have a block in the upper left-hand area that associates a channel number and a bit number with a function. The channel number gives the location of the I/O module on the individual rack. The bit number gives the I/O bit that the software can read or write and the function tells what the bit toggles or reads.
In the lower left area is a pictorial representation of the actual I/O rack. The drawing shows where the relays are and what their function is. It also tells what relay should be plugged into each slot. Notice that between each relay and its screw terminal is noted what color relay should be installed. The other important piece of information shown here is the position of the various bus bars. These are sheet metal strips that are used to connect from two to eight terminals together.
On the right-hand side of the drawing is a table showing the destination or the output connections of the I/O relays. The first column gives the I/O bit for programming. The pin column refers to the screw terminals on the edges of the relay racks. The next three columns give the connector and pin numbers that the output is connected to. The sixth column tells what relay part number populates each position on the relay rack. The last column tells the function that the relay controls. On the right-hand side of the table are the channel numbers as labeled on the board.
Board #1 Controller #0
This board contains the following functions:
TV ON: I/O bit 29 can be set to turn on the Photometrics CCD TV camera.
FANS ON: Bit 30 turns the locker 1 cooling fans. This function is controlled by the Galil controller and is independent of the instrument computer.
OVER TEMP SHUTDOWN: Bit 31 controls the AC power connection to the locker. The instrument computer can cut the AC power if the temperature rises above 85 degrees F. in the locker. If this path fails there is a 85º F mechanical thermostat that can also shut down the locker.
ION PUMP PUSHBUTTON: Bit 32 is wired to the Varian ion pump controller in parallel with the reset switch. This allows the computer to reset the controller. The controller itself lives inside locker #1and the reset pushbutton is not normally accessible. To save having to open the locker the reset function has been remoted.
IN FWD LIMIT: Bit 46. This relay powers the forward limit LED on the manual paddle.
IN REV LIMIT: Bit 47. This relay powers the reverse limit LED on the manual paddle.
STAGE IS MOVING: Bit 48. This relay powers the moving LED on the manual paddle.
Board #2 Controller #0
This board has no connections at this time. It is available for future expansion.
Board #3 Controller #0
This board contains the following functions:
M2, M1, AND M0: Bits 73-75. These signals are inputs from the manual paddle for controller #0. These three bit are from the mode thumbwheel switch.
S2, S1, AND S0: Bits 76-78. These three bit are from the stage thumbwheel switch. They determine which stage will be operated by the paddle.
AUTO/MAN: Bits 79. This input comes from the manual/computer control switch on the manual paddle. In the MANUAL position the paddle is active and the computer is locked out (ONLY IN SOFTWARE.) In the COMP position the computer has control and the paddle is locked out.
STOP: Bits 80. This is the level from the STOP push button on the paddle. It is used to halt the motion of the current (selected by the stage thumbwheel) stage.
FWD AND REV: Bits 81 & 82. These levels are from the FORWARD and REVERSE push buttons on the paddle. They are used to initiate movement of the stage selected by the stage select thumbwheel switch in the mode selected in the mode thumbwheel switch.
TOGGLE1 AND TOGGLE2: Bits 83 & 84. These levels are from the general purpose push button switches at the bottom of the paddle. These are not used on controller #0 but the switches are wired and tied off inside the paddle for future use.
ION PUMP SWITCH OK: Bit 91. This input is connected to the Varian ion pump controller. It monitors a wafer on the meter range switch and is asserted if the switch is in the 5KV range. This tells the computer that the current reading coming through the EL-1230 24 Channel Analog Input card is valid.
COOLANT PRESSURE IS OK: Bit 92. (This function was not implemented)
COOLANT FLOW IS OK: Bit 93. This level is connected to the Proteus flow switch which indicates that the coolant is flowing through and cooling the instrument.
ION PUMP AC OK: Bit 96. This input is connected to the Varian ion pump controller. It is connected across the AC power after the control relay. Thus, it tells the state of the controller - either on or off.
Board #4 Controller #1
This board contains the following functions:
HATCH OPEN AND HATCH CLOSE: Bit 27 & 28.These outputs supply 120VAC to the Skinner solenoids and control the opening and closing of the hatch by controlling the air into the Bimba cylinder that operates the hatch.
COPPER ARGON: Bit 29. This output is reserved for future use.
FANS ON: Bit 30 turns the locker 1 cooling fans. This function is controlled by the Galil controller and is independent of the instrument computer.
OVER TEMP SHUTDOWN: Bit 31 controls the AC power connection to the locker. The instrument computer can cut the AC power if the temperature rises above 85 degrees F in the locker. If this path fails there is a 85º F mechanical thermostat that can also shut down the locker.
COPPER ARGON, XENON, ARGON, QUARTZ: Bits 32-35. These outputs are wired to the individual power supplies for the various calibration lamps.
LAMP FANS: Bit 36. This output supplies AC to the lamp cooling fan. This fan blows cooler air into the calibration lamp housing to cool the lamps.
IMAGE FLAT, LOW DISP FLAT, AND PD PRISM BRAKES: Bits 39-40. These outputs supply +28V DC to the stage brakes for these stages. The brake is engaged when the power is off and disengaged when power is applied.
IN FWD LIMIT: Bit 46. This relay powers the forward limit LED on the manual paddle.
IN REV LIMIT: Bit 47. This relay powers the reverse limit LED on the manual paddle.
STAGE IS MOVING: Bit 48. This relay powers the moving LED on the manual paddle.
Board #5 Controller #1
This board has no connections at this time. It is available for future expansion.
Board #6 Controller #1
This board contains the following functions:
M2, M1, AND M0: Bits 73-75. These signals are inputs from the manual paddle for controller #1. These three bit are from the mode thumbwheel switch.
S2, S1, AND S0: Bits 76-78. These three bit are from the stage thumbwheel switch. They determine which stage will be operated by the paddle.
AUTO/MAN: Bits 79. This input comes from the manual/computer control switch on the manual paddle. In the MANUAL position the paddle is active and the computer is locked out (ONLY IN SOFTWARE.) In the COMP position the computer has control and the paddle is locked out.
STOP: Bits 80. This is the level from the STOP push button on the paddle. It is used to halt the motion of the current (selected by the stage thumbwheel) stage.
FWD AND REV: Bits 81 & 82. These levels are from the FORWARD and REVERSE push buttons on the paddle. They are used to initiate movement of the stage selected by the stage select thumbwheel switch in the mode selected in the mode thumbwheel switch.
TOGGLE1 AND TOGGLE2: Bits 83 & 84. These levels are from the general purpose push button switches at the bottom of the paddle. These are used to open and close the front hatch on controller #1.
AIR PRESSURE IS OK: Bits 89. This input comes from the air pressure switch on the low pressure side of the regulator. This function has been supplemented by the air pressure transducer that supplies a analog value proportional to the actual air pressure.
HATCH IS OPEN: Bits 93. This input receives the level from the reed switch at the 'open' end of travel of the hatch Bimba cylinder.
HATCH IS CLOSED: Bits 94. This input receives the level from the reed switch at the 'closed' end of travel of the hatch Bimba cylinder.
![]()
![]()
![]()